The HTML Editor appears in many situations when you are creating or editing records.

Type content in the editor, and use the controls to format content and add links or images. Some common actions are described below.
Note: Different HTML Editor controls may have different sets of toolbars. For example, when using the E-mail feature, the control for the Optional Message has a limited set of toolbar buttons. Administrators may opt to use the same control for specific HTML Editor controls on Add/Edit Screens.
To add
a link: Select the text that should function as a link, click the Insert/edit link button  ,
then fill in the fields to define the Link URL, Target, and so on.
To remove
a link: Click anywhere in the link text and click the Remove link
button  .
.
To add content from any Search Results page: Copy the content from a viewing pane and paste it into the HTML Editor. Any links for that content will automatically be included.
To add an image, click the Insert/edit image button  .
.
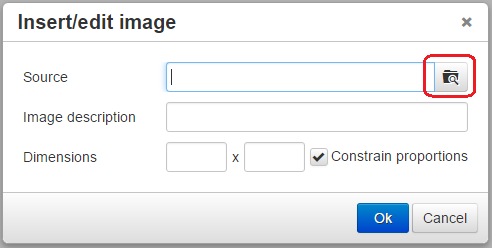
In the Insert/edit image dialog box, click the Browse button next to the Source box to open the Image dialog box.

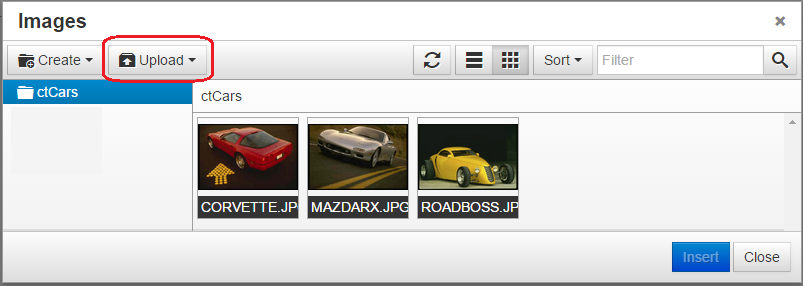
If a lot of images appear, you can use the Filter control to search for images by file name. If you don't see the image that you want, open the Upload menu, select Local machine, locate and select the desired images, then click Open.

The images will appear in the Image dialog box. Click the image you want to use. The URL to that image will appear in the Source box of the Insert/edit image dialog box. Use the Dimensions controls to specify the size of the image, then click OK to add the image to the HTML Editor.
To work directly in HTML: Click
the Source code button  to launch a pop-up
window that lets you modify the HTML source directly. The control does not
validate the HTML, so you should test any hand-coded HTML in all supported
Web browsers to ensure that it displays correctly.